
If you are not a makeup pro, applying simply a kajal can seem like a daunting task. What to do, what to apply, when to apply –– there are so many questions. Find answers to these common questions here and learn how to ace the art of achieving a flawless look. With these makeup application correct order, it’s easy to create a variety of beautiful looks.
Makeup Application Correct Order
Step 1- Moisturizer
Want your makeup to stay on longer? Before you begin applying your makeup, take the time to prep your skin with a high-quality moisturizer as it makes skin hydrated and helps skin to look less dull. Otherwise, if you apply foundation on dry skin, it can cause it to look cakey. Therefore always start with moisturizer as it smoothes the skin’s surface for a more even foundation or concealer application.
Choosing the right kind of moisturizer is very important. A variety of them are available, listed from lightest to heaviest: Face mists, serums, lotions, creams, oils etc. Once you’ve applied enough moisturizer, gently rub it in using circles, and wait for a few minutes to dry before moving on to the next step.
ALSO READ- Eat Collagen Rich Foods For Beautiful Glowing Skin
Step 2- Primer & Color Corrector
Now that your skin is well moisturized, prep your face with primer. Primer is as important as moisturising your skin! Primer is basically a seamless base for the foundation or faces makeup that will help it go on smoother and last longer, come rain or shine. It reduces the appearance of pores and keeps shine at bay, without making your skin look super dry.
Using a primer and/or colour corrector is optional. Colour correctors are used to cover up any signs of blemishes or discolouration. It comes in shades like orange, green, purple, peach, and yellow. In case, you have wheatish to dark skin, an orange corrector can be used for any skin concern you like to cover up. Green corrector is essential for acne-prone skin.
Step 3- Liquid Foundation
Foundation is a great way to even out your skin tone! This will help set your other products properly and give your face that filter-like effect. Apart from making your skin appear flawless, it leaves it with a healthy and radiant sheen!
Remember, the right shade of foundation can make all the difference. Therefore, finding the perfect shade for your skin is priority number one. For application, you may use your fingers or opt for beauty tools like brushes and sponges. Keep in mind that if you want a more full-coverage look, go for an applicator brush or beauty blender. And yes, if you have even skin, you can skip foundation entirely and dab a few spots of concealer on your trouble spots instead.
ALSO READ- Anti Ageing Skin Tips- How To Get Younger Looking Skin
Step 4- Concealer
Concealers are made to hide all your imperfections. It gives your skin that extra coverage that a foundation doesn’t. It comes in two categories- liquid and stick/compact.
If you want light coverage over a large area of your face, use liquid concealer. For heavier coverage on smaller, more specific areas of the face, use stick/compact concealers. In case, you’re looking for a very light base though, you can skip the foundation and go with just a concealer.
Some prefer to apply concealer before liquid foundation. The order of these two steps is truly a matter of your choice—and trial and error. You may try out both and discover which method works best for creating a smooth, radiant finish on your skin.
Step 5- Compact Powder
Now use a compact powder to dab away any excess oil and keep your makeup in place. It also adds light coverage to your skin and evens out your complexion. The compact powder has a sheer coverage that moisturises and hydrates makeup. It sets makeup for a longer wear time.
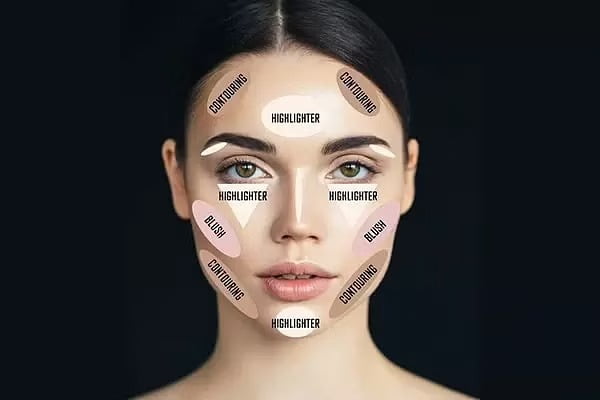
Step 6- Bronzer/ Blush & Highlighter
Bronzer
Want a sun-kissed glow? Apply bronzer! It adds depth to the skin. Choose according to the colour of your skin. Generally, it should only be 1 or 2 shades darker than your natural skin tone. There are mainly four types of bronzers: cream (for dry skin), powder (for oily skin), liquid (gives a natural sun-kissed look), and gel (long-lasting).
Blush
Blush can give you a pretty, youthful glow. So if you want to add a bit more colour and vibrancy to your complexion, blush may be the key. But you need to choose the right shade to flatter your complexion.
- For very pale, fair skin- opt for light pinks for a pretty flush of colour that won’t overpower your tone.
- For light-medium skin- choose a peachy pink shade to give your skin a pretty glow.
- For golden or olive skin tones- the warm undertones to the skin can stand up to brighter, punchier pinks.
- For darker skin tones-go for brighter hues with warm undertones, like a bright apricot.
Highlighter
And for a dewy or glowing effect, use a highlighter. Highlighter is actually trending now as it adds a natural glow to your skin. Just dab a little bit of highlighter on the high points of your face – cheekbones, brow bones, the tip of your nose, and cupid’s bow. Make sure to blend away!
ALSO READ- DIY Lemon Facial Scrub: For Oily, Dry And Normal Skin
Step 7- Eyeshadow, Eyeliner, & Mascara
When it comes to makeup, eyeshadows can be a game-changer. It can instantly uplift your eye. Start with a nude eyeshadow that complements your skin tone and blend it in thoroughly. This step helps maximize the longevity and intensity of the colours you use in just about any look. Whether you choose neutral shades or go bold with colourful hues, make sure to use two complementary eyeshadows: one lighter shade, and one darker shade.
Types of Eyeliner– Liquid, Gel and Pencil (the best eyeliner option for beginners).
In case, you’re going to use only one makeup product, mascara should be at the top of your list. A few swipes of mascara can make your eyes look dramatic in a single step. Mascara comes in a variety of colours, but black and brown tend to be the most popular. Always start by curling your eyelashes with an eyelash curler.
Note- Coated eyelashes can get in the way when you’re trying to nail winged liner, so swipe on your mascara after applying your eyeshadow and eyeliner.
Step 8- Eyebrows
Doing eyebrows might not seem like an important step, but it actually adds definition and frames to your face. The intensity of your eyebrows should complement the rest of your makeup. Shape and fill your arches correctly. Opt for lighter strokes and make your brows look naturally full!
ALSO READ- Potato Beauty Benefits: 3 Ways For A Brighter Clear Skin
Step 9- Lips
Last but not least- Lips. Applying lip colour is always a good final step in your makeup routine. But before applying prep your lips. If your lips are chapped and cracked, make sure to use a gentle lip scrub to remove any dead skin and soften it with a protective lip balm. And then begin with your favourite hues as no look is ever complete without the perfect pout!
Step 10- Setting Spray or Powder
You can use one, both, or neither, but these two products are made to help your makeup stay on all day long, without greasing, creasing, or shining. Therefore, it’s important to invest in a quality setting solution. Apply them right before you head out the door.
The power of makeup is undeniable. With this step-by-step guide, get ready to boost your confidence and face the world head-on!